AWS DevOps Pro Certification Blog Post Series: Code Commit
This is part of the blog post series: AWS DevOps Pro Certification
Caveat emptor
Using AWS costs money, some of these services may not be part of the AWS Free Tier. You can keep costs down by tearing down anything you've created whilst learning, but it's still possible to run up a hefty bill so pay attention to the instances you setup!
I'm very lucky to be able to use my employer's AWS account. You should ask your place of work if a similar arrangement can be made as part of your study.
Velocius quam asparagi conquantur
The format of the blog posts is liable to change as I try refine my mental model of each domain, so be sure to revisit the blog posts on a regular basis.
What?
Code Commit is:
- a managed Version Control service
- Git based (using HTTPS or SSH for connections)
- Files are encrypted at rest, keys can be found in can be found in IAM > Encryption Keys.
- AWS CLI:
aws kms list-aliases | jq '.Aliases[] | select(.AliasArn | contains("codecommit"))'
- AWS CLI:
- Security credentials for HTTPS and SSH connections are defined in IAM per user. Pro-tip: if you need to brush up on IAM, see Helen Anderson's excellent guide: Don't you know who IAM?
Why?
Spotted a little gem in the FAQ that asks how Code Commit compares against a versioned S3 bucket. Enabling versioning on an S3 bucket means that when you upload a file that already exists, the older version is replaced, but you can still view and download it through the version history (see screenshot).
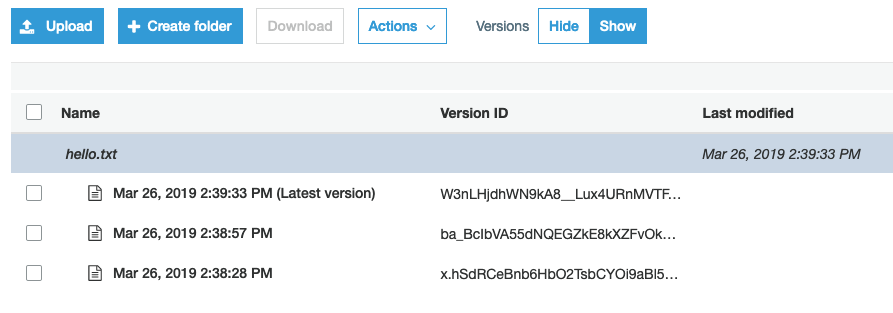
Whilst this might be okay for reverting back to the previous version of the code, it's handled on a per-file basis. Now imagine trying to track all the files that make up a version of your code?
This is really an argument against version control systems (VCS) and file versioning. VCS was created to simplify change tracking in the source code.
Pro-tip: bit rusty on S3? Yup Helen's got you covered again with What's in the bucket?
When?
SDLC automation
~~~~~~~~~~~~~~~~

CodeCommit -> ???
This is the start of SDLC automation. Everything else hinges on a source code repository. CI can't build and test code until it can pull the code from somewhere.
How?
This is loosely based around the Getting Started section of the User Guide.
The main difference is that I'm going to use the CLI instead of the Web UI to aid in learning these commands too.
Create a repo aws codecommit create-repository --repository-name hello-codecommit
{
    "repositoryMetadata": {
        "accountId": "123456",
        "repositoryId": "dc2c437d-e850-4a8b-82e7-7ad85fee99d1",
        "repositoryName": "hello-codecommit",
        "lastModifiedDate": 1553613552.003,
        "creationDate": 1553613552.003,
        "cloneUrlHttp": "https://git-codecommit.xxx.amazonaws.com/v1/repos/hello-codecommit",
        "cloneUrlSsh": "ssh://git-codecommit.xxx.amazonaws.com/v1/repos/hello-codecommit",
        "Arn": "arn:aws:codecommit:xxx:1234567890:hello-codecommit"
    }
}
We're going to use SSH to communicate with our new repo, so let's set up a dedicated key (hello-codecommit) and upload the public key to our IAM account.
ssh-keygen -b 4096 -f hello-codecommit-ssh
# output has been omitted
aws iam upload-ssh-public-key --user booyaa \
  --ssh-public-key-body "$(cat hello-codecommit-ssh.pub)"
{
    "SSHPublicKey": {
        "UserName": "booyaa",
        "SSHPublicKeyId": "VALUE_OF_SSHPUBLICKEYID",
        "Fingerprint": "FINGERPRINT",
        "SSHPublicKeyBody": "REDACTED",
        "Status": "Active",
        "UploadDate": "2019-03-26T15:46:14Z"
    }
}
Make a note of your SSHPublicKeyId, we'll need to add new entry to your ssh config (~/.ssh/config):
Host git-codecommit.*.amazonaws.com
User VALUE_OF_SSHPUBLICKEYID
IdentityFile /path/to/hello-codecommit-ssh
Let's clone our empty repo, you can find the Git URL by looking at the output from running aws codecommit create-repository. The key name is cloneUrlSsh.
git clone ssh://git-codecommit.xxx.amazonaws.com/v1/repos/hello-codecommit
Cloning into 'hello-codecommit'...
# omitting boring git stuff
warning: You appear to have cloned an empty repository.
Let's go into our new repo, add a file, commit and push it back up.
cd hello-codecommit
echo "Hello world" > index.html
git add index.html
git commit -m 'initial commit'
git push
Next, let's create a feature branch so we can use the pull request feature.
git checkout -b feature/index-markup
replace the contents index.html with the following:
<!doctype html>
<html lang="en">
<head>
  <meta charset="utf-8">
  <title>Hello world</title>
</head>
<body>
  Hello world
</body>
</html>
git commit -am '(feat) use markup'
git push -u origin feature/index-markup
aws codecommit create-pull-request \
  --title "Feature: use markup for the index page" \
  --description "What: switch from plain text to markup. Why: markup allows for a richer web experience" \
  --client-request-token booyaa-markup-1234 \
  --targets repositoryName=hello-codecommit,sourceReference=feature/index-markup
The client-request-token switch is a token we randomly generated, it's used by the API to ensure request cannot be repeated with a changed parameter. If you run that command again, you get the output from the previous transaction instead of a new pull request.
The targets switch requires the repository name (hello-codecommit) and the branch you're raising a pull request for (feature/index-markup).
Finally let's teardown aws codecommit delete-repository --repository-name hello-codecommit-ui, you'll get back the repositoryId if you were successful.
API and CLI features and verbs
Features
- Repository
- Branch
- File/Folder
- Commit/Differences/Blob
- PullRequest
- Comments
- Trigger
Verbs (CRUD)
- create
- batch-get/get/list/describe
- update/put
- delete
Outliers
- test-repository-triggers
- merge-pull-request-by-fast-forward
AWS DevOps Pro Certification Blog Post Series
- Intro
- SDLC automation
- Code Commit
- Code Build
- Code Deploy
- Code Pipeline
- Domain 2: Configuration Management and Infrastructure as Code
- Domain 3: Monitoring and Logging
- Domain 4: Policies and Standards Automation
- Domain 5: Incident and Event Response
- Domain 6: High Availability, Fault Tolerance, and Disaster Recovery